Workflows
Workflows is a builder in KAWA for creating multi-step processes. See definitions in Terminology section. A workflow can be started:
- on a schedule,
- manually,
- after a data source is successfully updated,
and the steps run one by one or in branches (using Logic steps).
- Workflows
- 1. Create a workflow
- 2. Set trigger
- 3. Add action
- 4. Save
- 5. Update workflow
- 6. Manual run & history
- 7. Reorder / Delete steps
1. Create a workflow
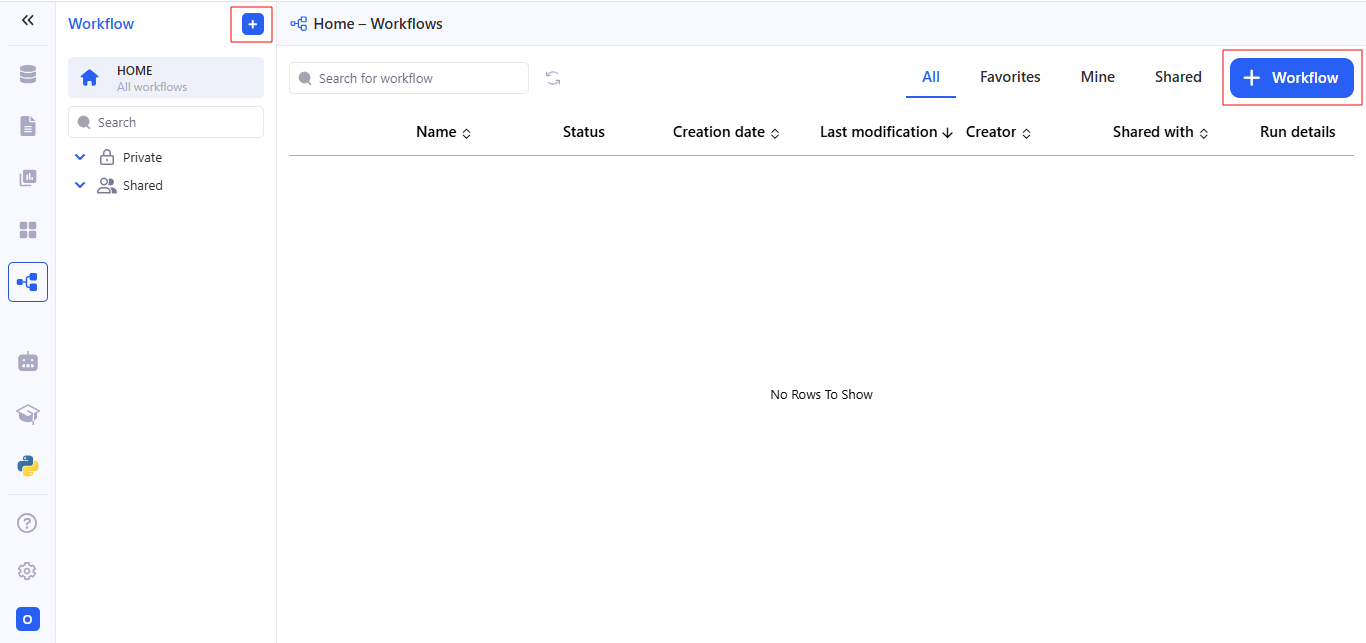
To create a new workflow, go to the Workflows section and click on + Workflow.
2. Set trigger
KAWA Workflows support three trigger types. Pick one in WHEN → Select a trigger.
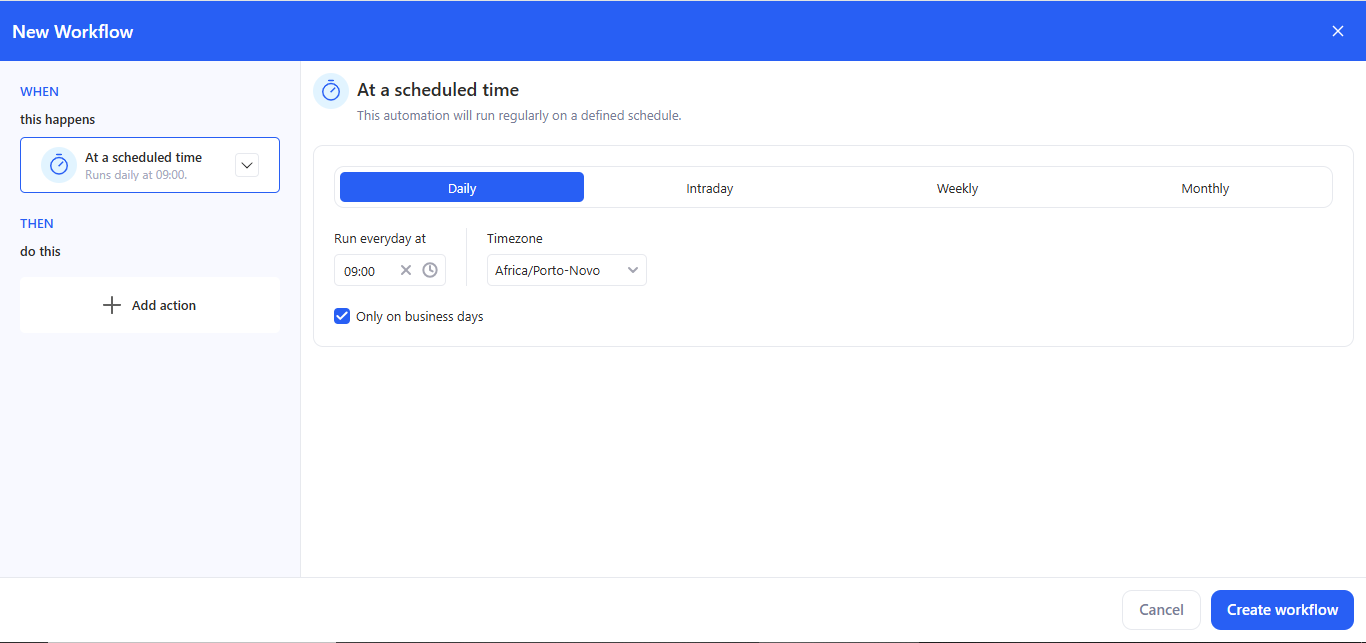
2.1 At a scheduled time
Use this when the workflow must run automatically.
- Choose At a scheduled time.
-
Configure:
- Daily / Intraday / Weekly / Monthly.
- Run time. Daily — Run at → pick an exact time (e.g., 09:00). Intraday — Run every N [seconds/minutes/hours]; optionally turn on Set custom time period. Weekly — Run on (choose weekdays) at (time). Monthly — Run every month on (day of month) at (time).
- Timezone.
- Only on business days (optional).
- The header shows the summary (e.g., Runs daily at 09:00).
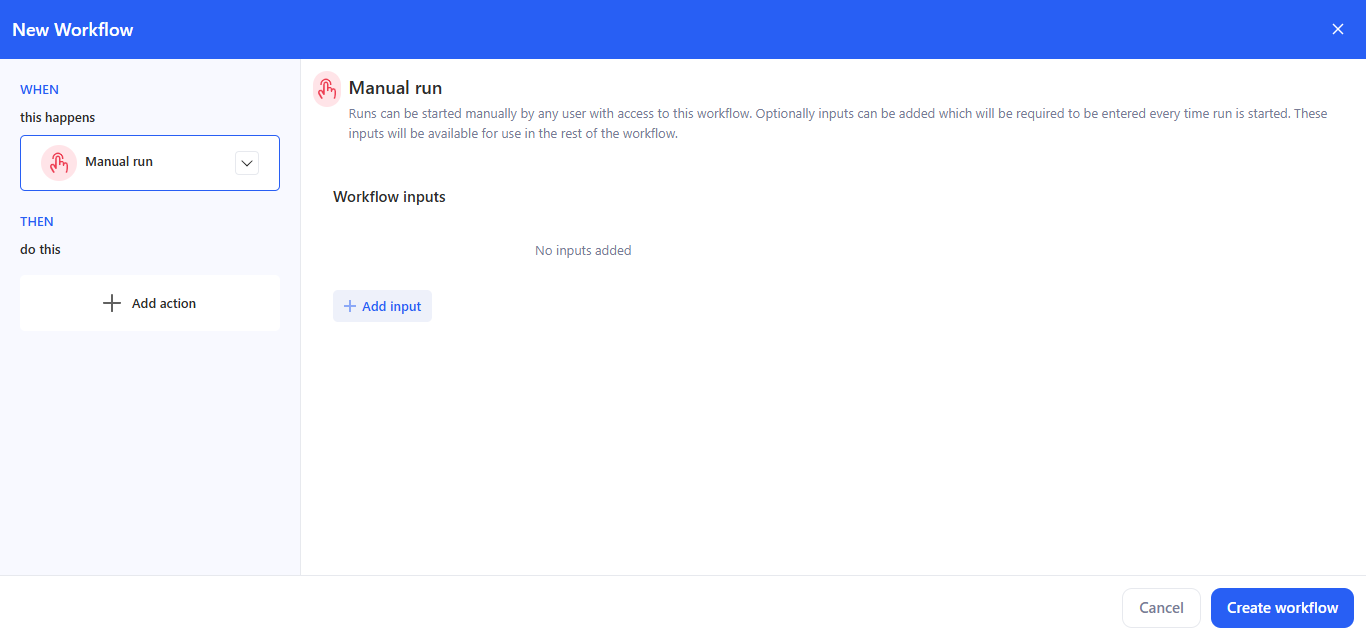
2.2 Manual run
Use this when the workflow is started on demand by a user.
- Choose Manual run.
- (Optional) Click + Add input to define parameters that the user must enter each time they start the run: Text, Select, Number, Date, Date Time, Boolean.
- These inputs are available to later steps via bindings:
- In Email / AI prompt editors: click + → Use data from → Choose data, then choose the input.
- In Run python script, Parameters: click + → Use data from → Choose data, then choose the input.
2.3 On data refresh
Use this trigger to run a workflow right after a data source is successfully refreshed.
- Choose On data refresh.
- Click + Add data source, find it in the list, and select it. Multiple sources are supported.
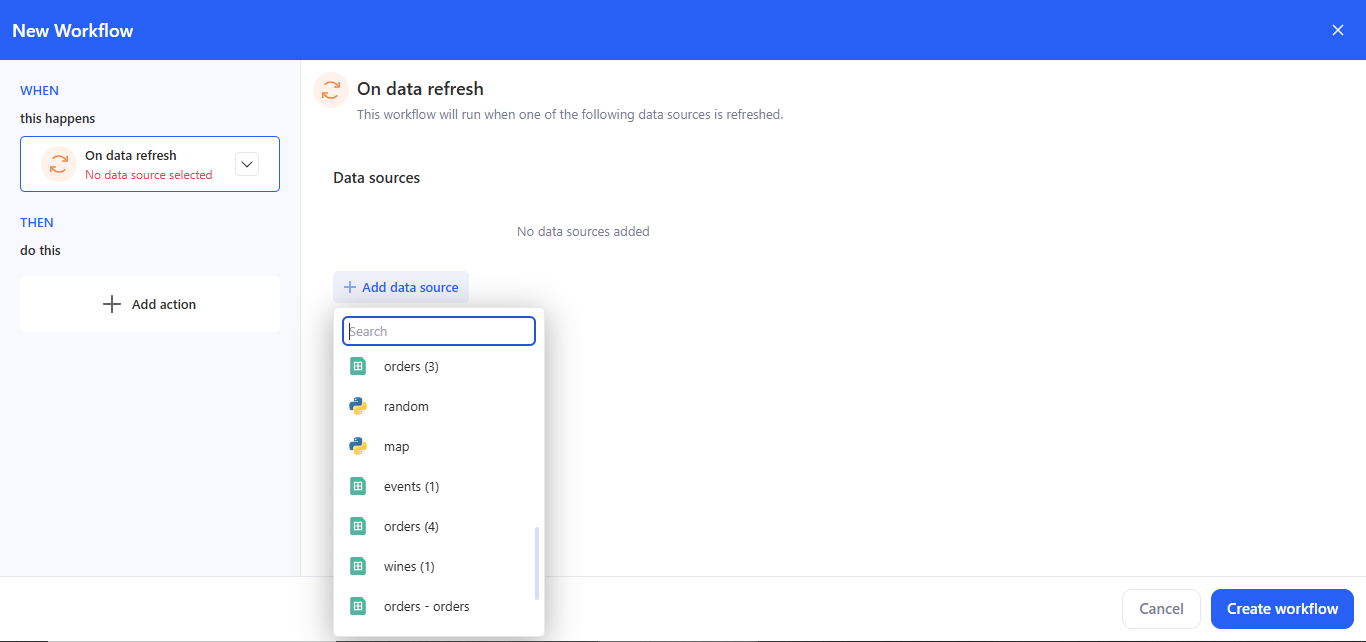
How it fires:
- Fires after a successful refresh of any selected source (Data source -> Overview -> Change data import).
- With multiple sources it uses OR logic — refresh of any selected source triggers the workflow.
3. Add action
Click Add action — the Actions panel opens; available categories:
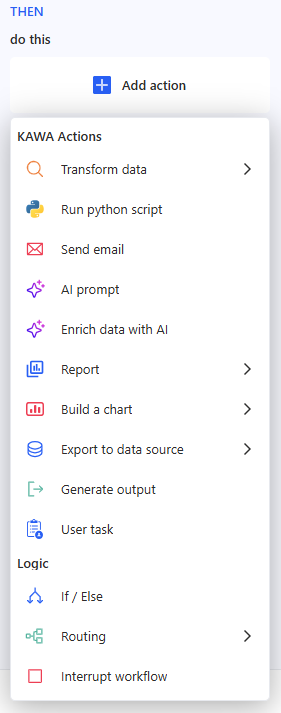
Below is how to set up each step type in practice.
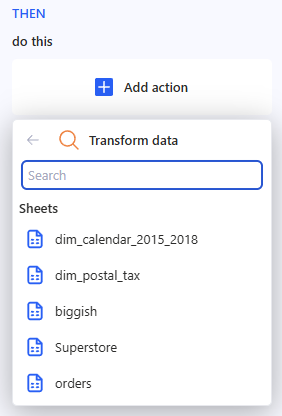
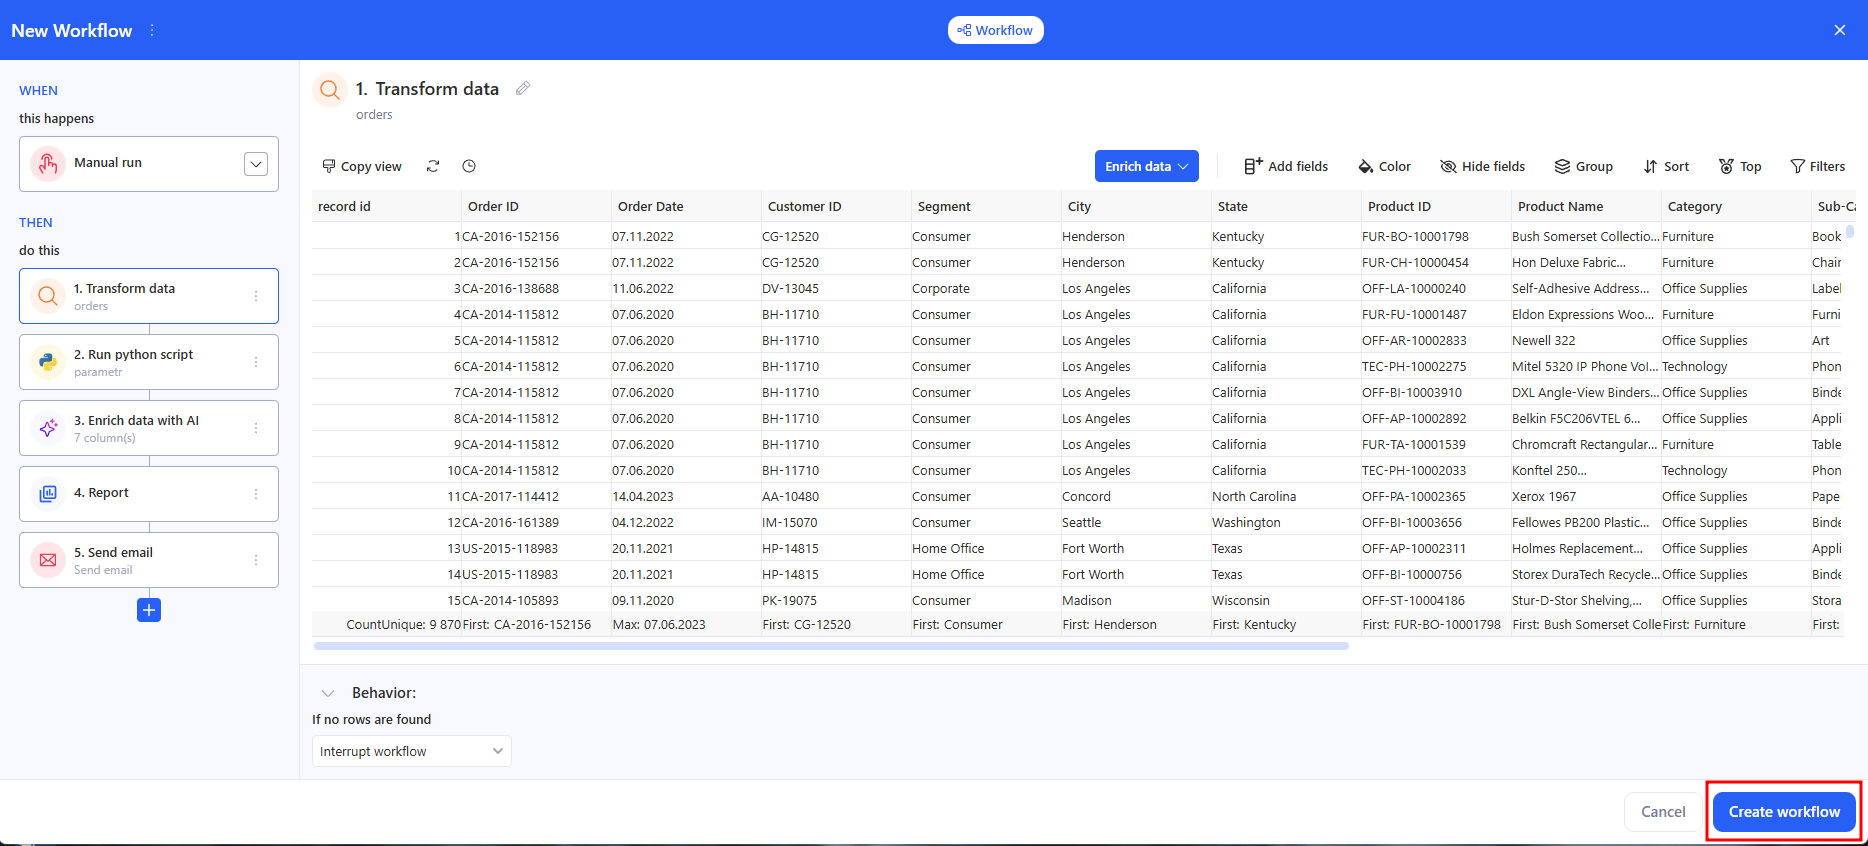
3.1 Transform data
- Choose a Sheet from the list.
- If needed, open Enrich data and use the quick transform icons.
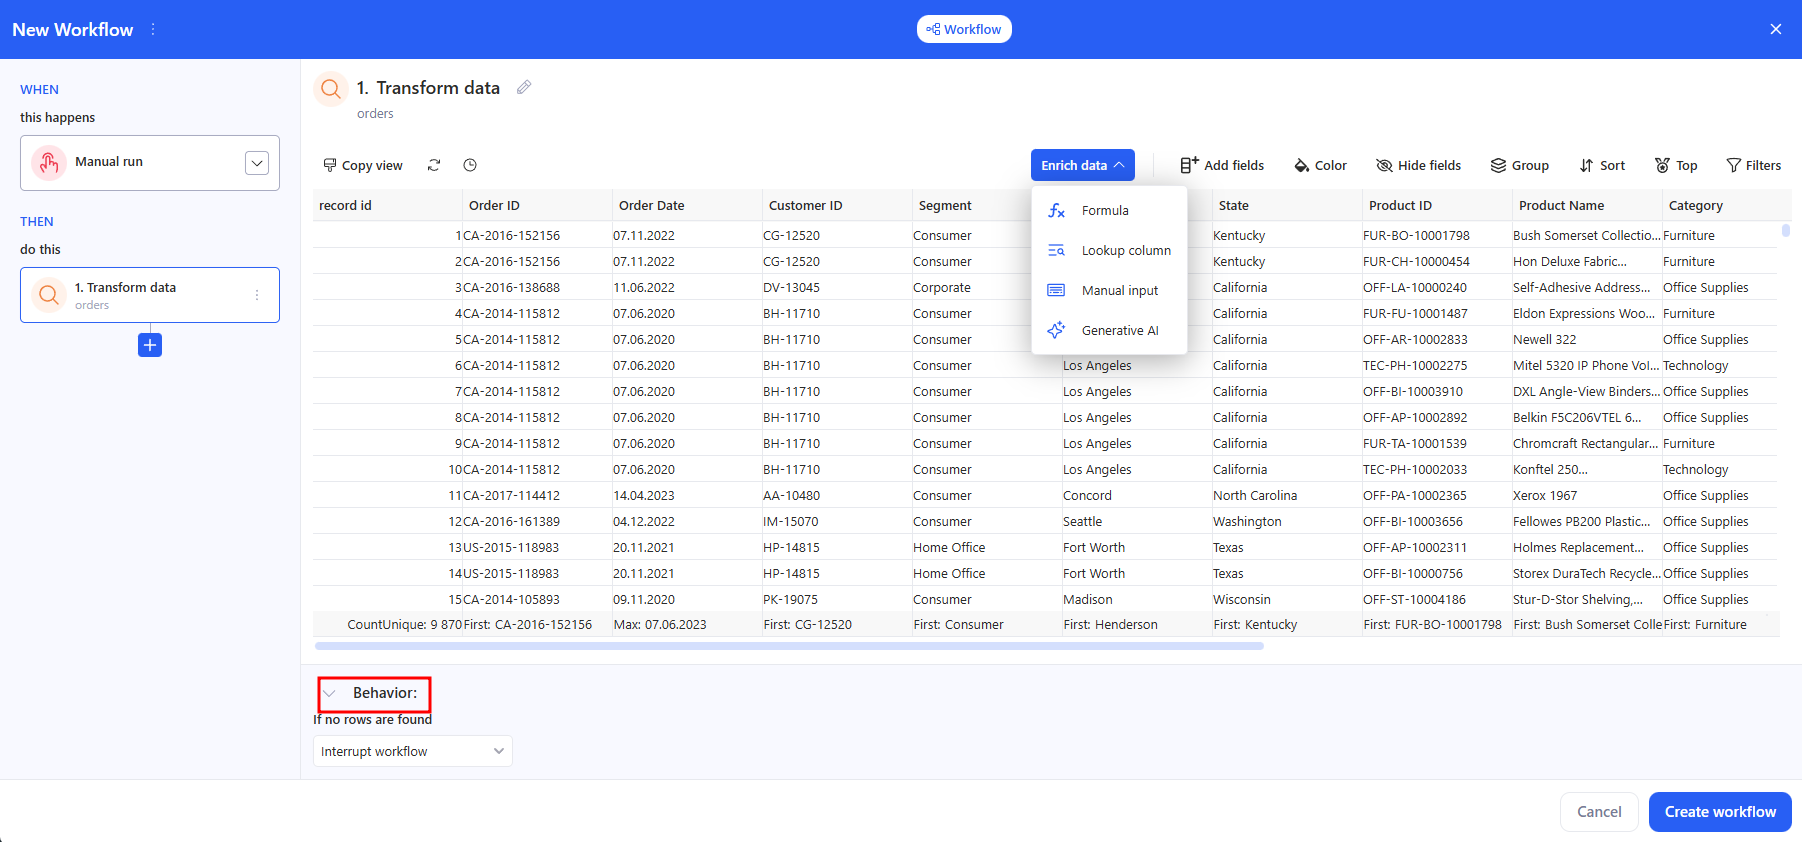
-
In the Behavior block, set:
- If no rows are found → Interrupt workflow / Continue without a result.
3.2 Run python script
- In Select python tool from the library, choose a tool.
- In Match tool inputs with any of the previous task outputs, connect the required inputs to the results of previous steps (for example, a dataframe from Transform data).
If a required input is empty or mis‑bound you’ll see Invalid task bindinqs.
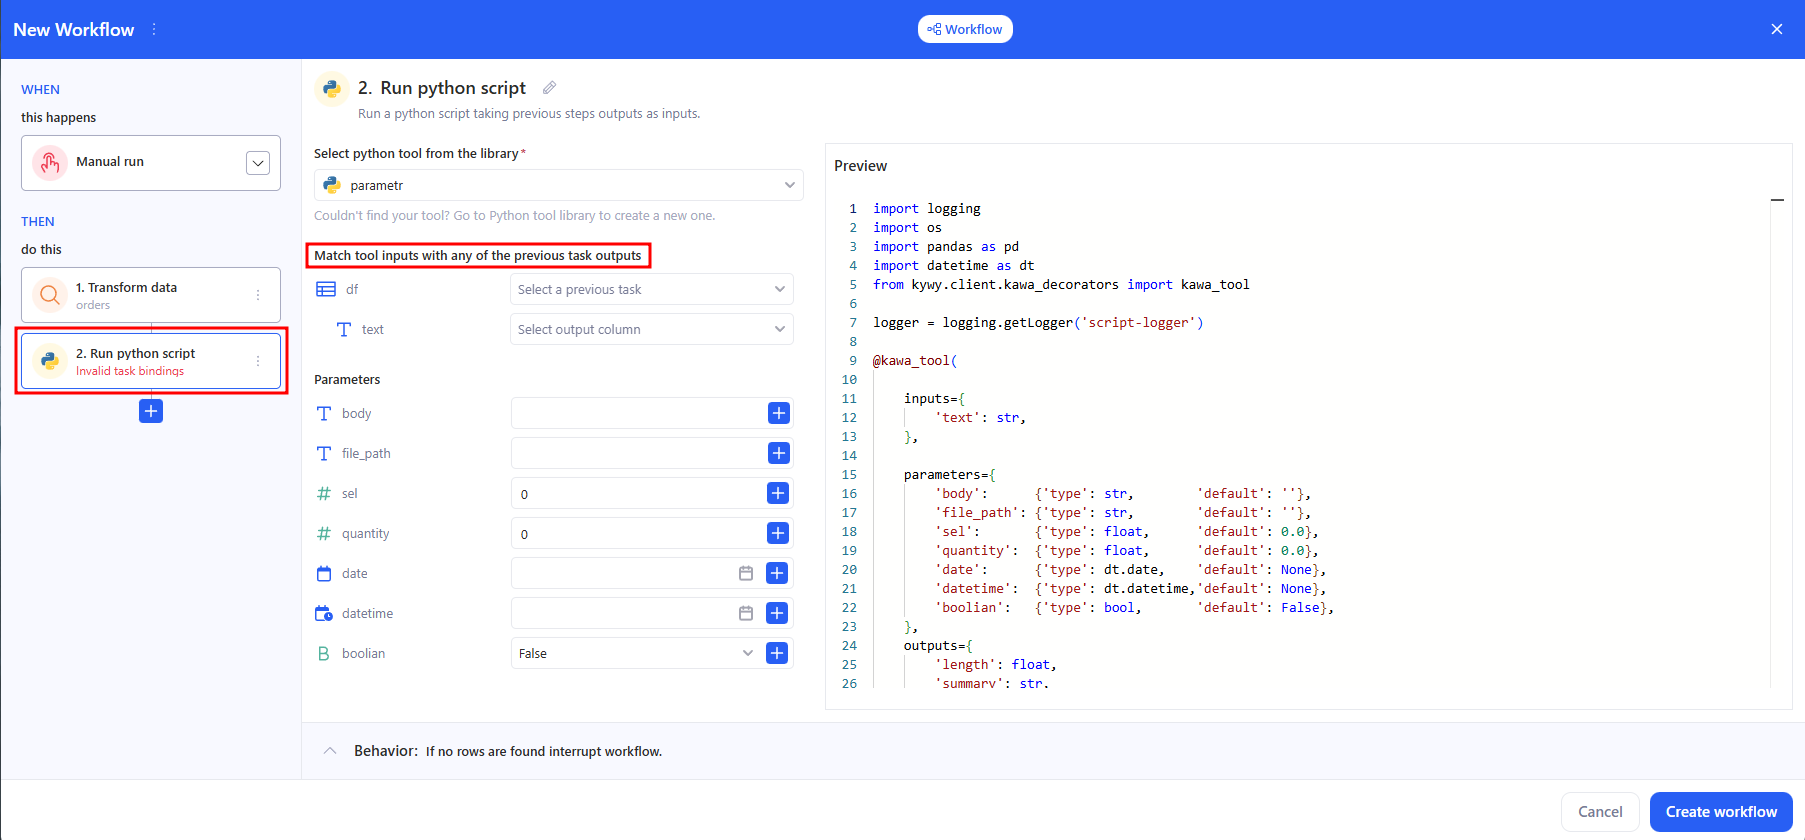
- Parameters (optional/named options) → they can also be bound to outputs from previous steps.
If a parametrs is empty you’ll see Invalid parameter bind.
- Behavior — the same row-based guards as in Transform data appear at the bottom.
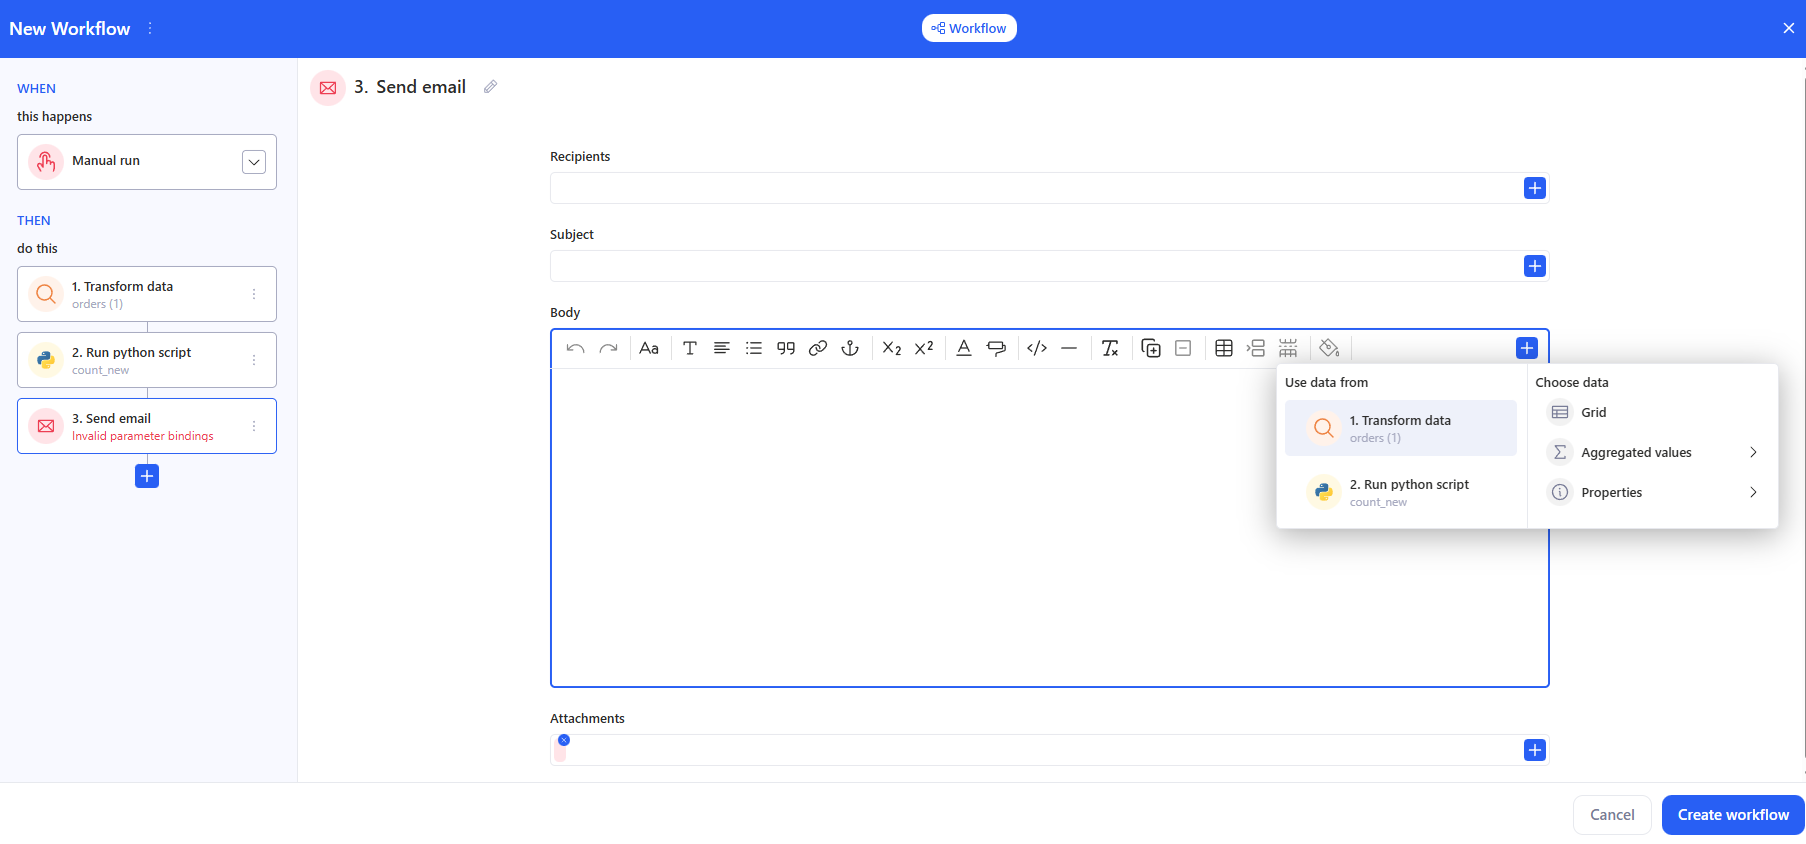
3.3 Send email
Recipients, Subject, and Body can be entered manually, or use the + on the right to insert values from previous steps (e.g., aggregates, tables, generated text, a link to a report, etc.). You can also add files to the email in the Attachments section.
If a required fields is empty you’ll see Invalid parameter bind.
3.4 AI prompt
- Enter the prompt text. Use the + button to insert variables/fragments from previous steps (transformation results, script outputs, etc.).
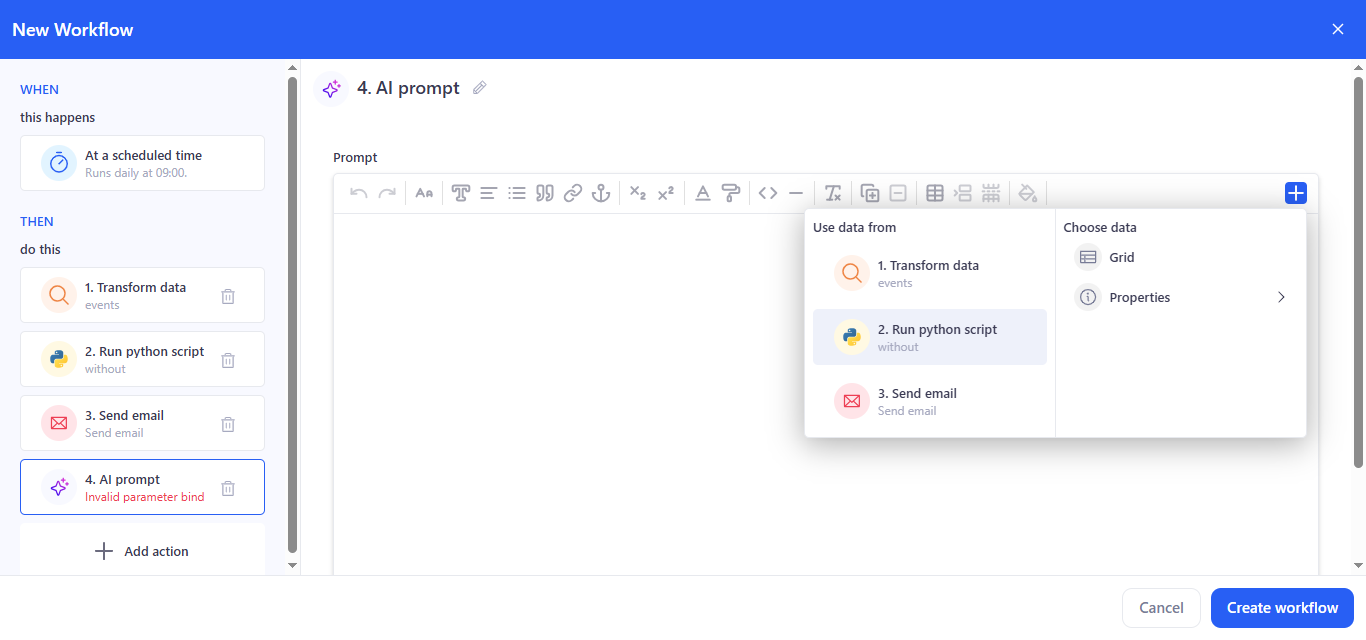
- Use the prompt for summarization, recommendations, and generating explanations.
3.5 Enrich data with AI
How to set up
a. Input table
Select a table from the previous step (for example, the result of Transform data). Without a selected table, the step won’t run.
b. Prompt
Describe what you want to generate for each row. In the prompt, you can reference fields from the input table (use data from the previous step as shown in the UI).
c. Outputs (what the model should generate)
Define the output schema in one of these ways:
- Generate from prompt — the system will try to create the outputs structure automatically from your prompt.
- Specify manually — manually add the required output fields/columns (recommended if you need a stable format).
d. Preview / Test
Check the result in Preview. Click Test to run generation and see how outputs are filled.
e. Behavior
Set what should happen if no rows are found in the input table (for example, Interrupt workflow).
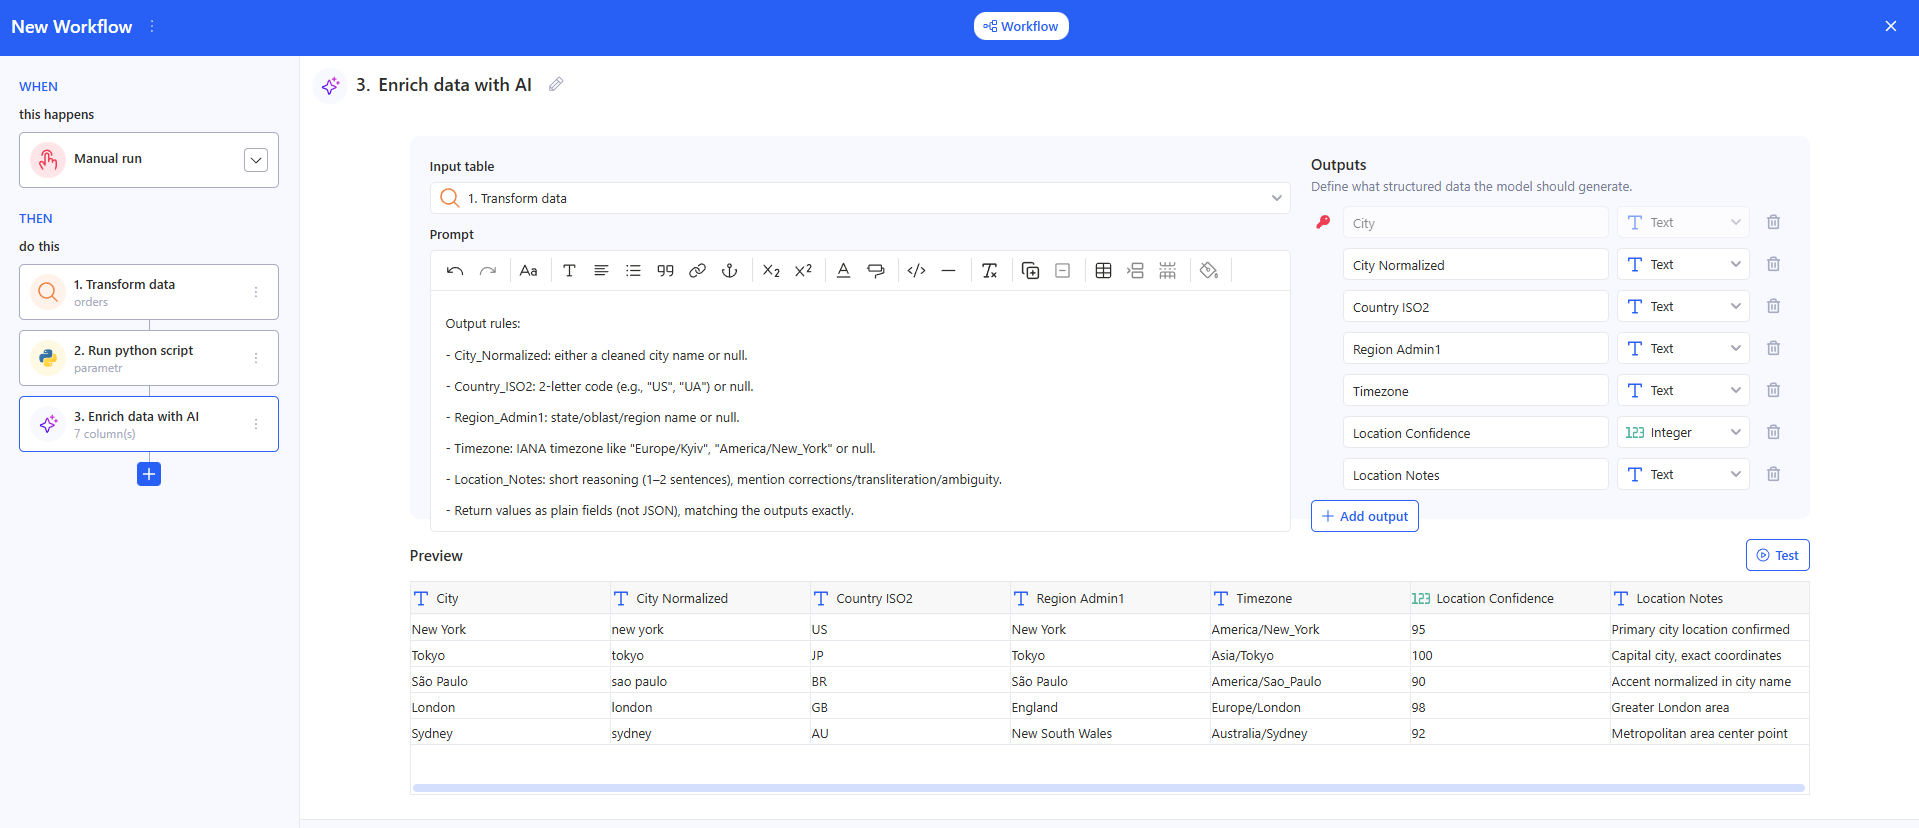
Result
This step returns a table with extra AI columns (outputs). You can use it in the next actions (email, export, report, logic, etc.).
3.6 Report
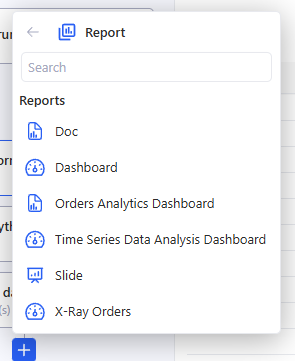
In the Report step, open the list, use Search if needed, and select the required report from the workspace so you can use it later as an artifact (for example, to send it in an email).
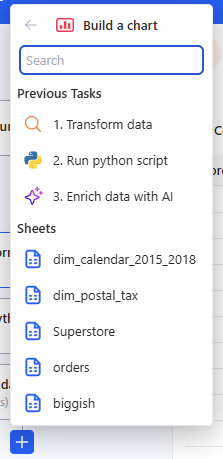
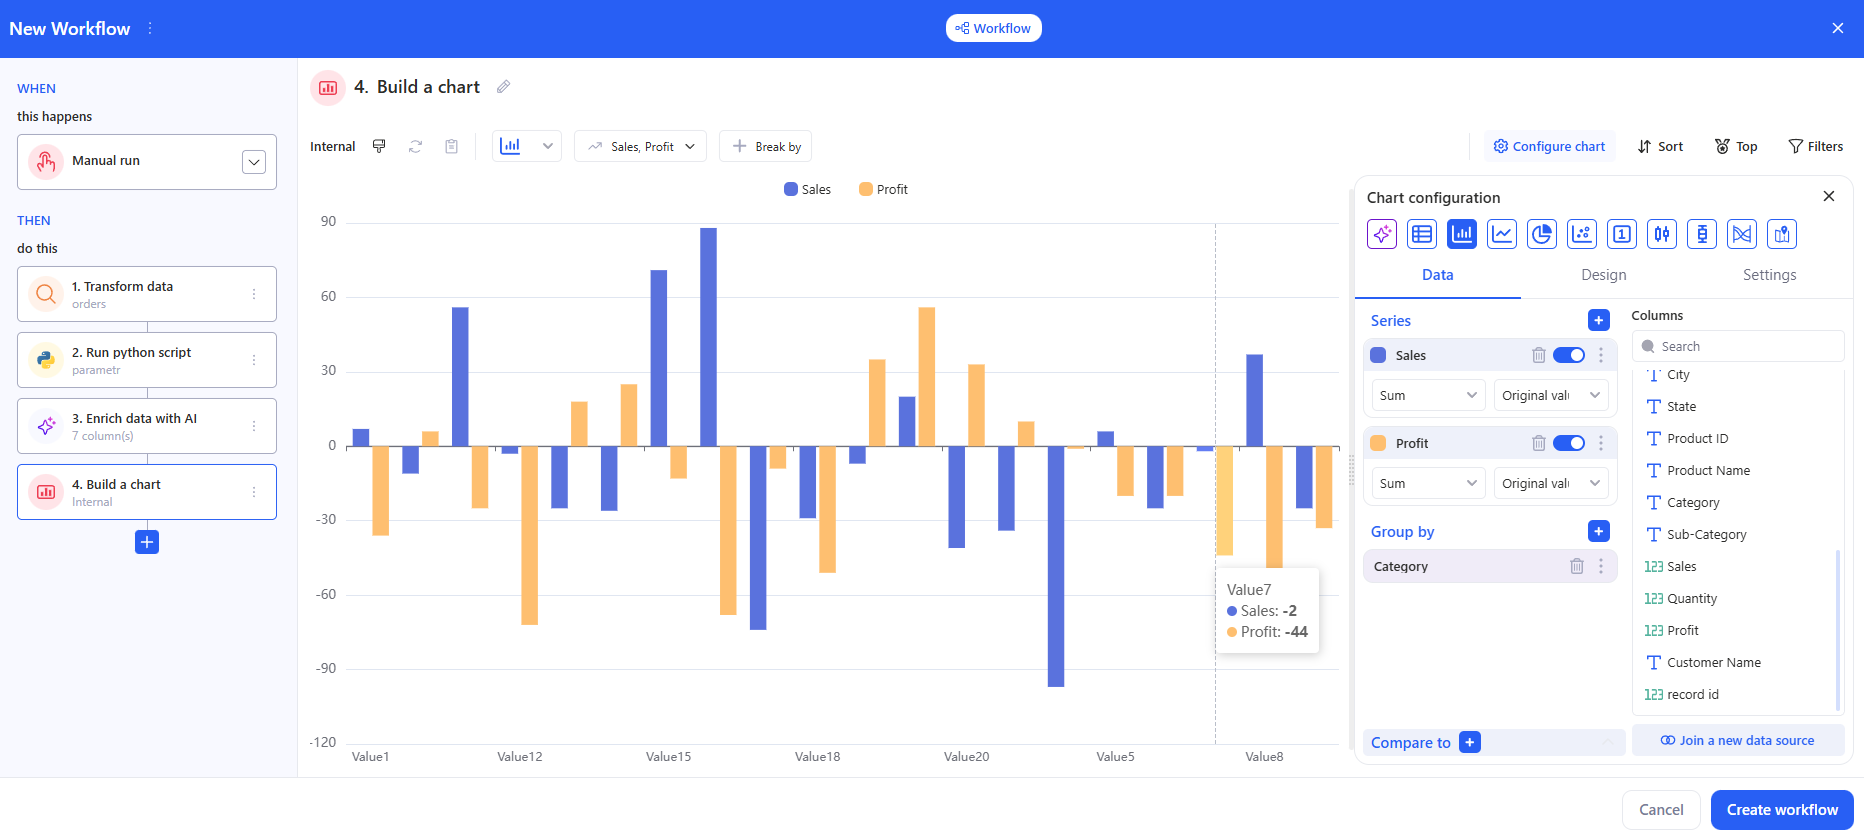
3.7 Build a chart
In the Build a chart step, choose a table from:
- Previous Tasks (for example, the result of Run python script or Transform data), or
- Sheets (any available sheet in the workspace).
- Configure the chart (the Chart configuration panel)
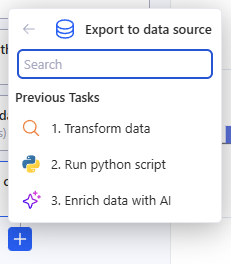
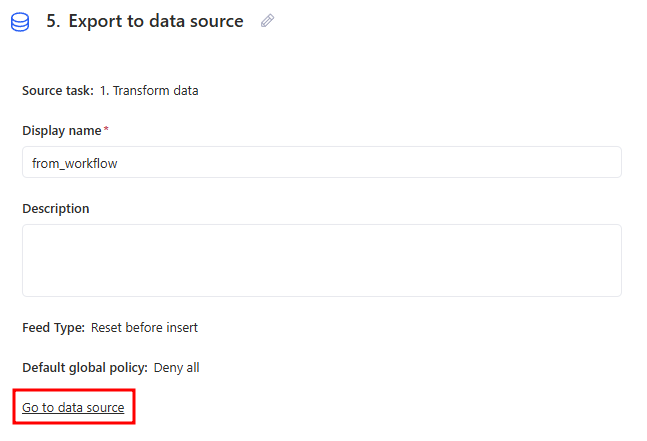
3.8 Export to data source
- In the Previous Tasks list, select the step that returns a table (for example, Transform data or Run python script). This choice determines what will be exported.
- In the Add task – Export to data source window, fill in the data source settings:
- Data source name — required (the destination name).
- Description — optional.
- Feed Type — export mode.
- Default global policy — access policy.
- Click Create.
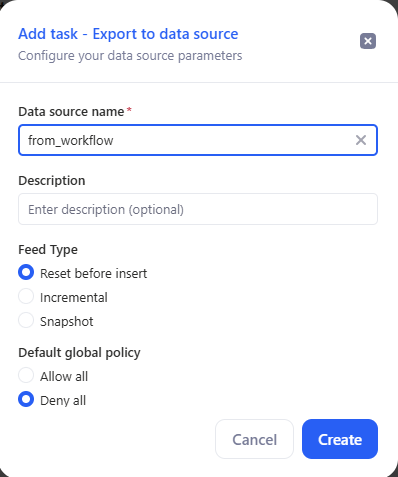
After creation, the Export to data source task screen will open. Then if needed, click Go to data source to open the created data source and change its settings.
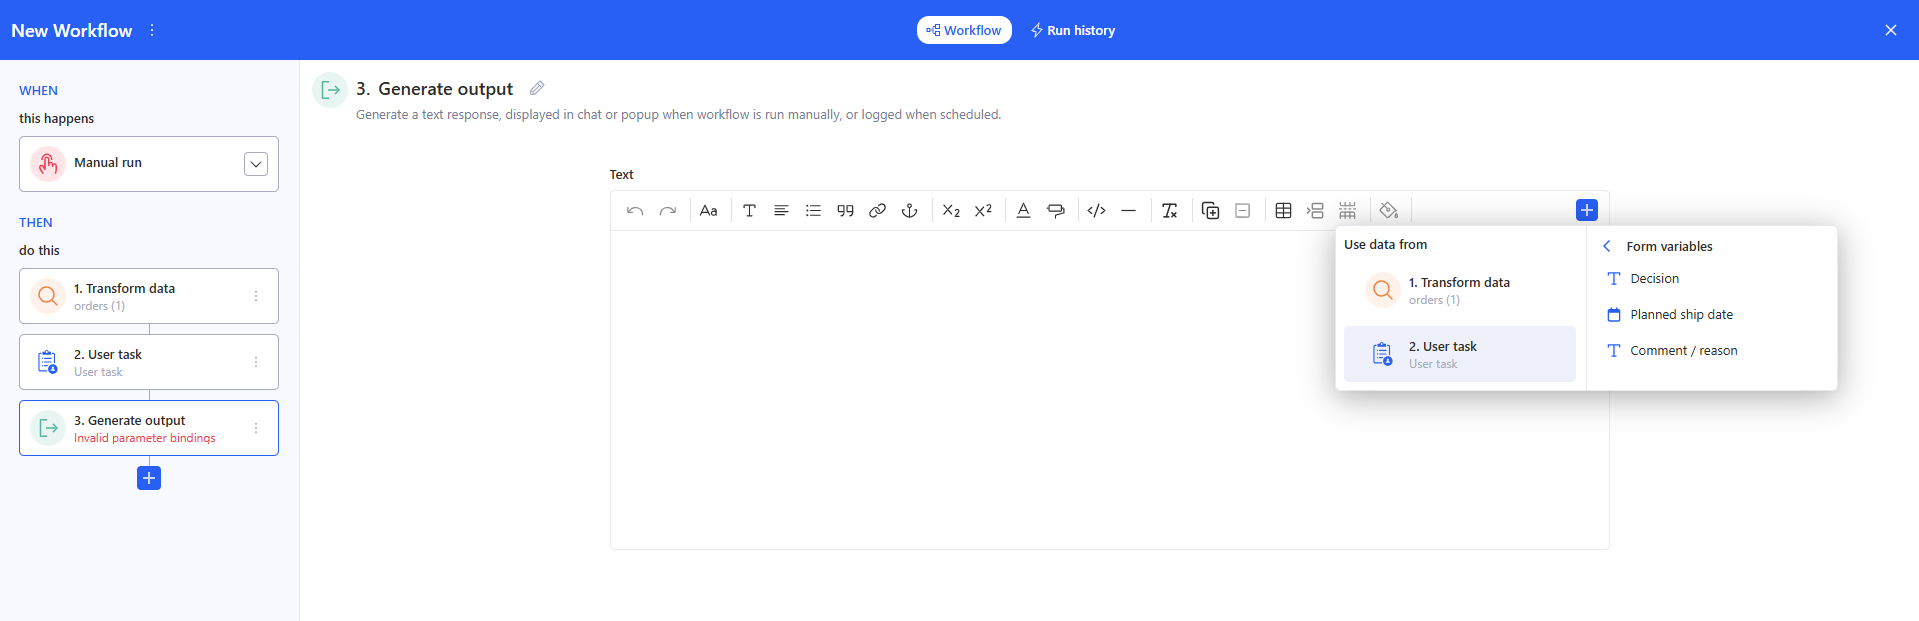
3.9 Generate output
- In the Text block, enter the message that the workflow should return. Use the + button to insert variables/fragments from previous steps (transformation results, script outputs, etc.).
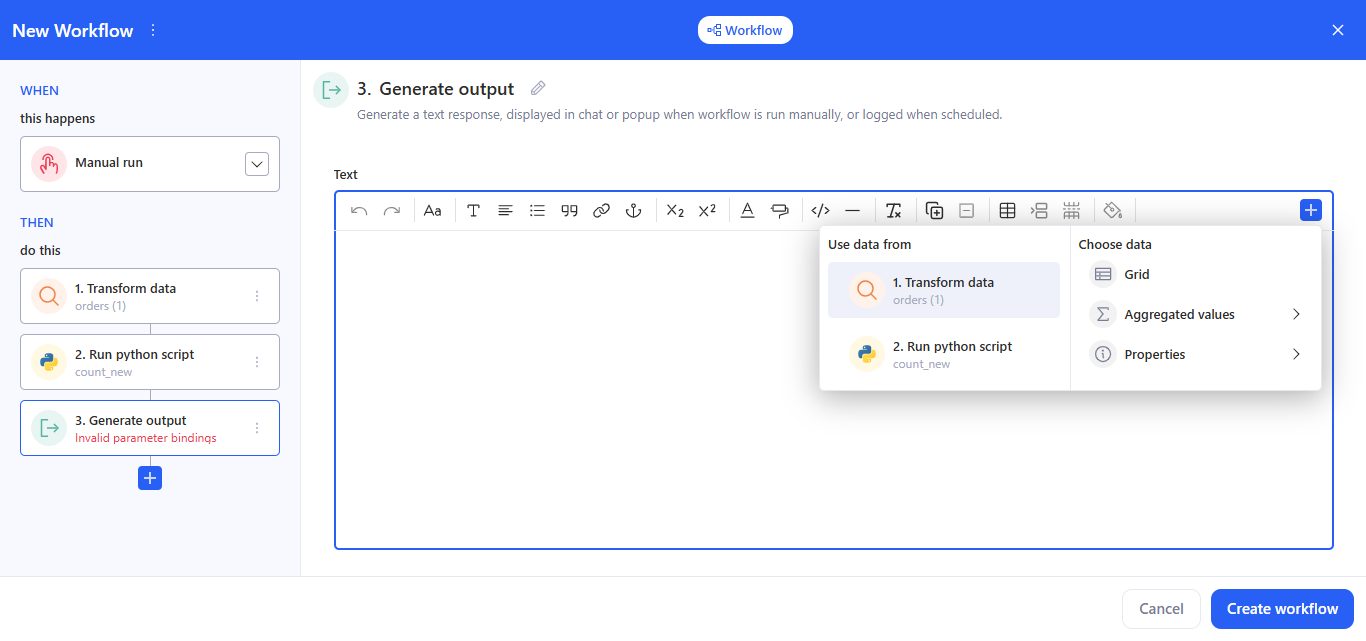
- Purpose: to generate a text output as the result of the workflow run.
3.10 User task
User task is a human-in-the-loop step. It pauses the workflow and creates a task for a user to complete a form. When the assignee submits the form, the workflow continues and the submitted values become available to the next steps.
Typical use cases:
- approval / validation before sending an email or exporting data;
- collecting missing parameters from a business user;
- routing to a colleague for a decision before continuing automation.
How to set up
- Add action → User task.
- Fill in:
- Assign Task To — choose the assignee(s) who will complete the task.
- Task Name — the task title shown to the assignee.
- Task Description — instructions (what to check, what to enter, acceptance criteria, etc.).
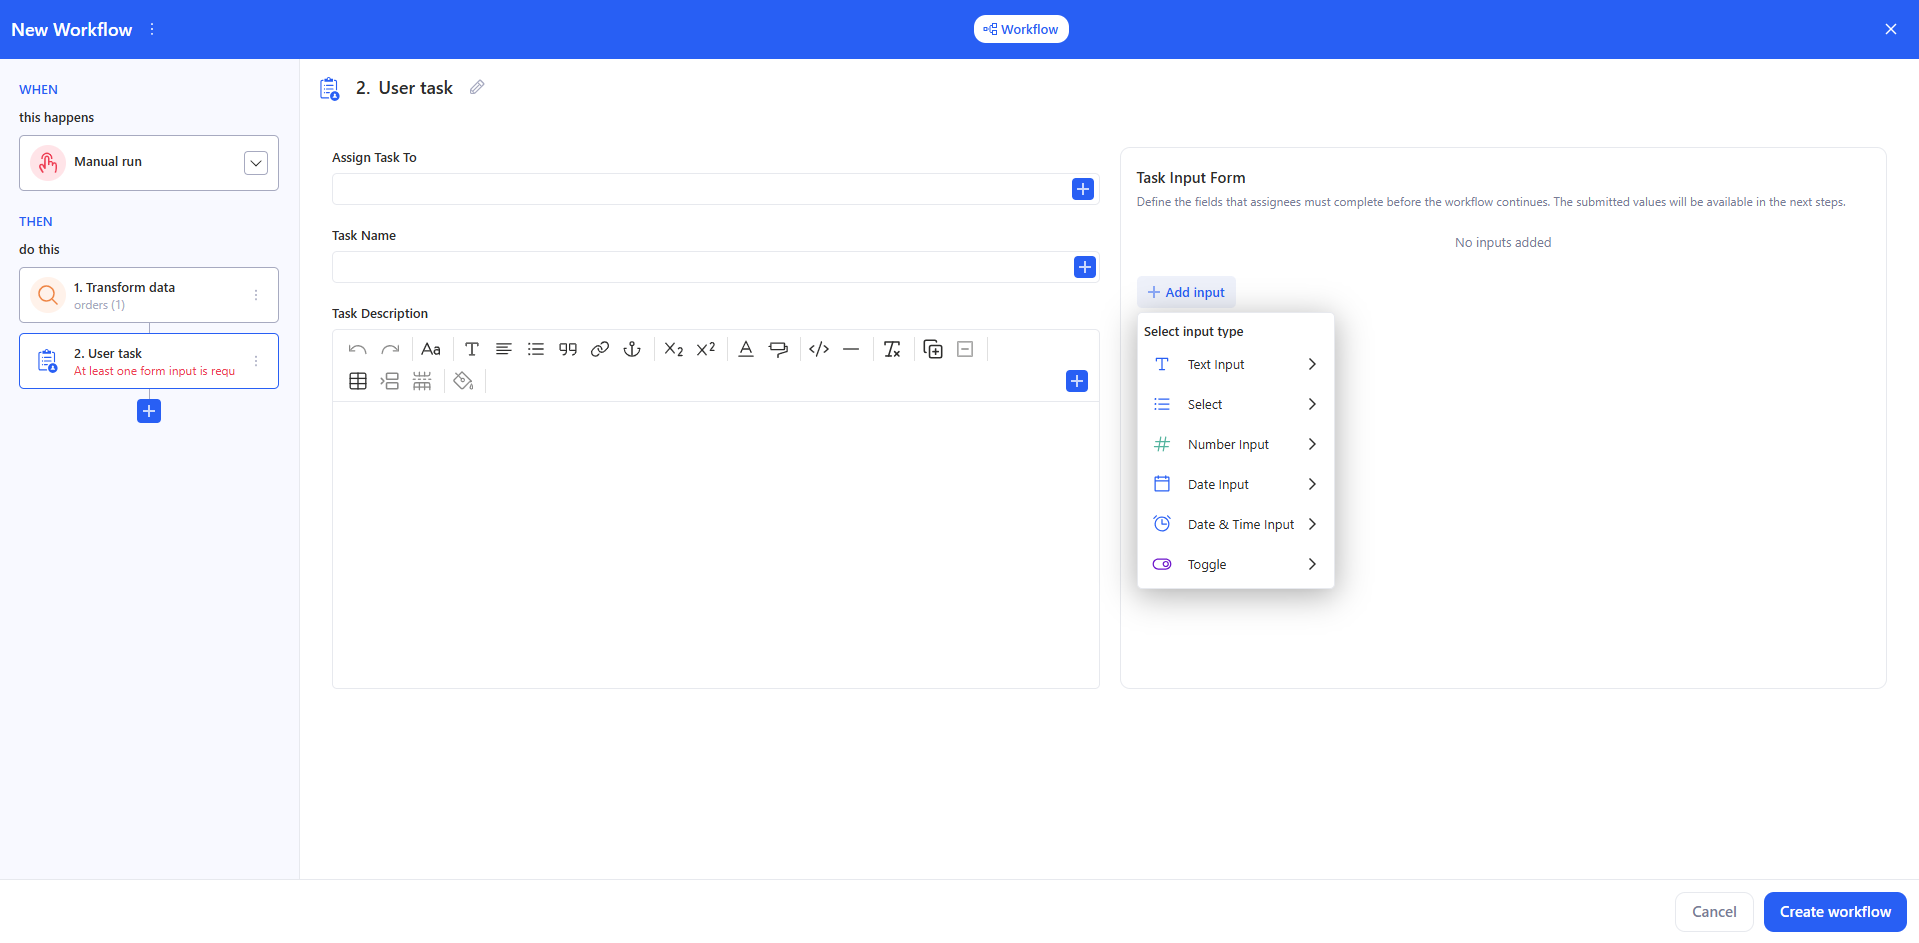
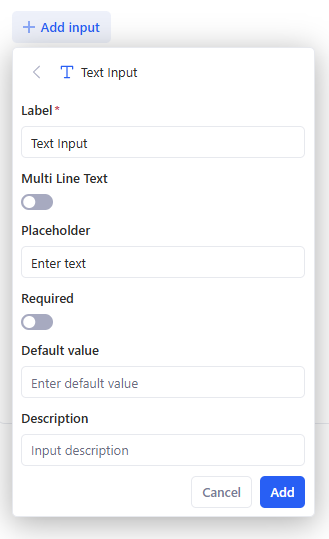
- In Task Input Form, click + Add input and add at least one field. Supported input types:
- Text Input
- Select
- Number Input
- Date Input
- Date & Time Input
- Toggle
If you don’t add any inputs, the step is invalid (you’ll see an error like “At least one form input is required”).
Run behavior
- When the workflow reaches User task, it creates a task and notifies the assignee (typically by email with a link to the form).
- The assignee opens the form, fills the fields, and clicks Submit.
- After submission, the workflow resumes from the next step.
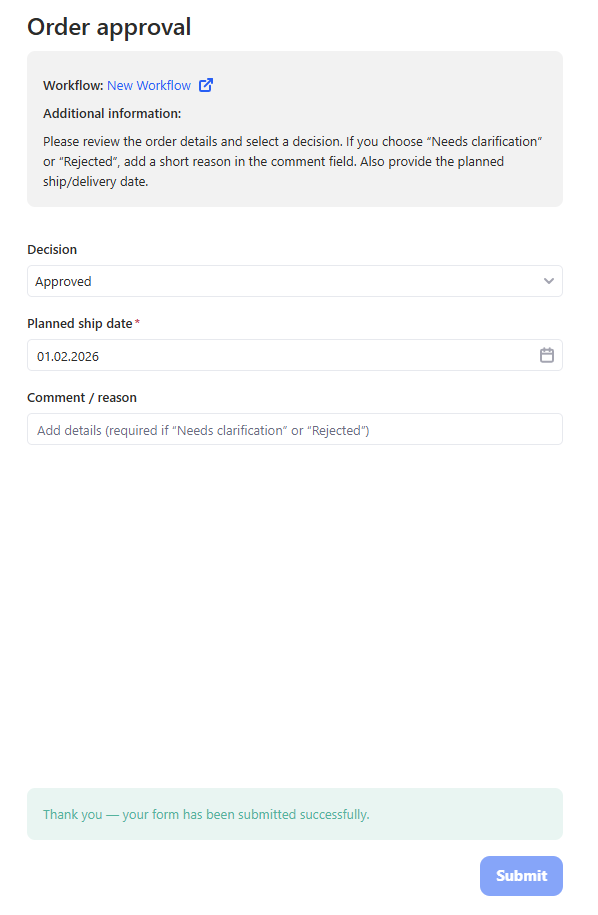
Use submitted values in later steps
- In any next step that supports bindings (e.g., Send email, AI prompt, Run python script parameters, Generate output), click + and choose: Use data from → User task → Form variables, then select the required field.
3.11 Logic: If / Else
If / Else is a logic step that splits a workflow into two branches:
- IF – runs when all conditions are true.
- ELSE – runs when at least one condition is not met.
The step uses data from previous actions: Transform data, Run python script, AI prompt, Send email, etc.
3.11.1 Add an If / Else step
- In the THEN section, click + Add action.
- In KAWA Actions, scroll to the Logic section.
- Select If / Else.
A new block appears in the steps list with two tabs:
- IF – conditions and actions for the “true” case.
- ELSE – actions for the alternative path.
Each tab has its own + Add action button to build the branch.
3.11.2 Add path rules
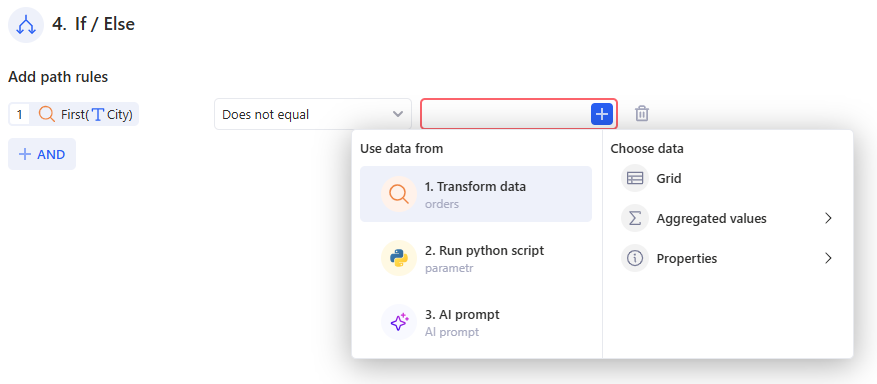
The behavior of If / Else is controlled by path rules – rows of conditions in the panel on the right.
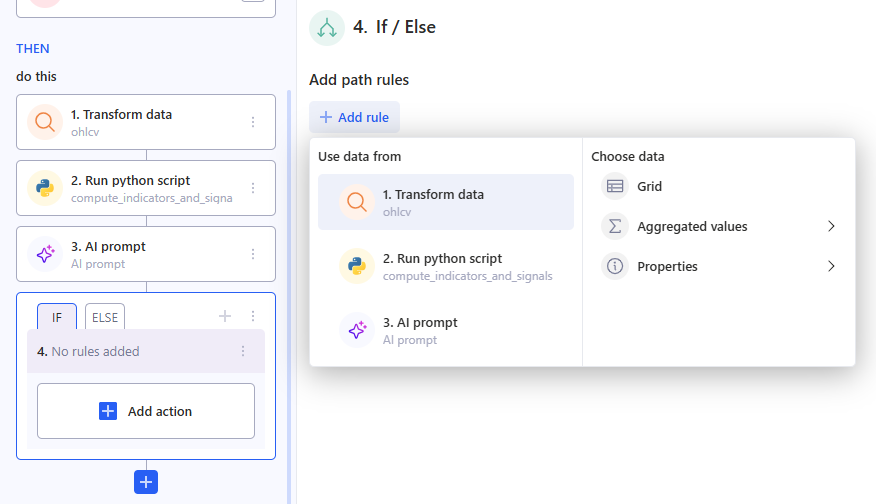
Each rule has three parts:
- The first field is what you check
(for example, an aggregate like “high”, a table “Grid”, or text like “Generated Content”). You pick it via Use data from → Choose data.
- The second field is the comparison type
Available operators depend on the data type.

- The third field is what you compare against
You can:
- type a value manually (for example, 0, warning, TRUE), or
- click the + button on the right and select data from previous steps.
This lets you compare:
- an aggregate with a fixed threshold;
- AI-generated text with another column;
- properties from different steps with each other.
Multiple rules
- Click + AND to add another condition.
- All rules inside an If / Else are combined with AND – they all must be true for the IF branch to run.
- The total number of rules is shown in the step name (for example, “5. 3 rules”).
3.11.3 Actions in the IF and ELSE branches
After you set up the rules, define what each branch should do.
- Select the IF or ELSE tab in the If / Else block on the left.
- Click + Add action inside that branch.
- Add the actions you need, for example.
Execution logic:
- If all rules are true, only the IF branch runs and the ELSE branch is skipped.
- If any rule is false, the ELSE branch runs (if it has actions).
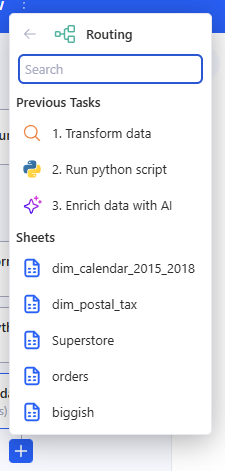
3.12 Logic: Routing
Routing is a logic step that lets you split the processing of one table into multiple routes (R1, R2, R3 …). In each route, you set up your own data “slice” (view) and add a separate set of actions.
3.12.1 How to add Routing
Choose the table source for Routing:
- Previous Tasks (for example, Run python script / Transform data), or
- Sheets (any sheet in the workspace).
After that, a table preview for Routing will open on the right.
3.12.2 How routes work (R1 / R2 / R3)
Routes are shown as tabs: R1, R2, R3…
- To open a route — click its tab.
- To add a new route — click + next to the tabs.
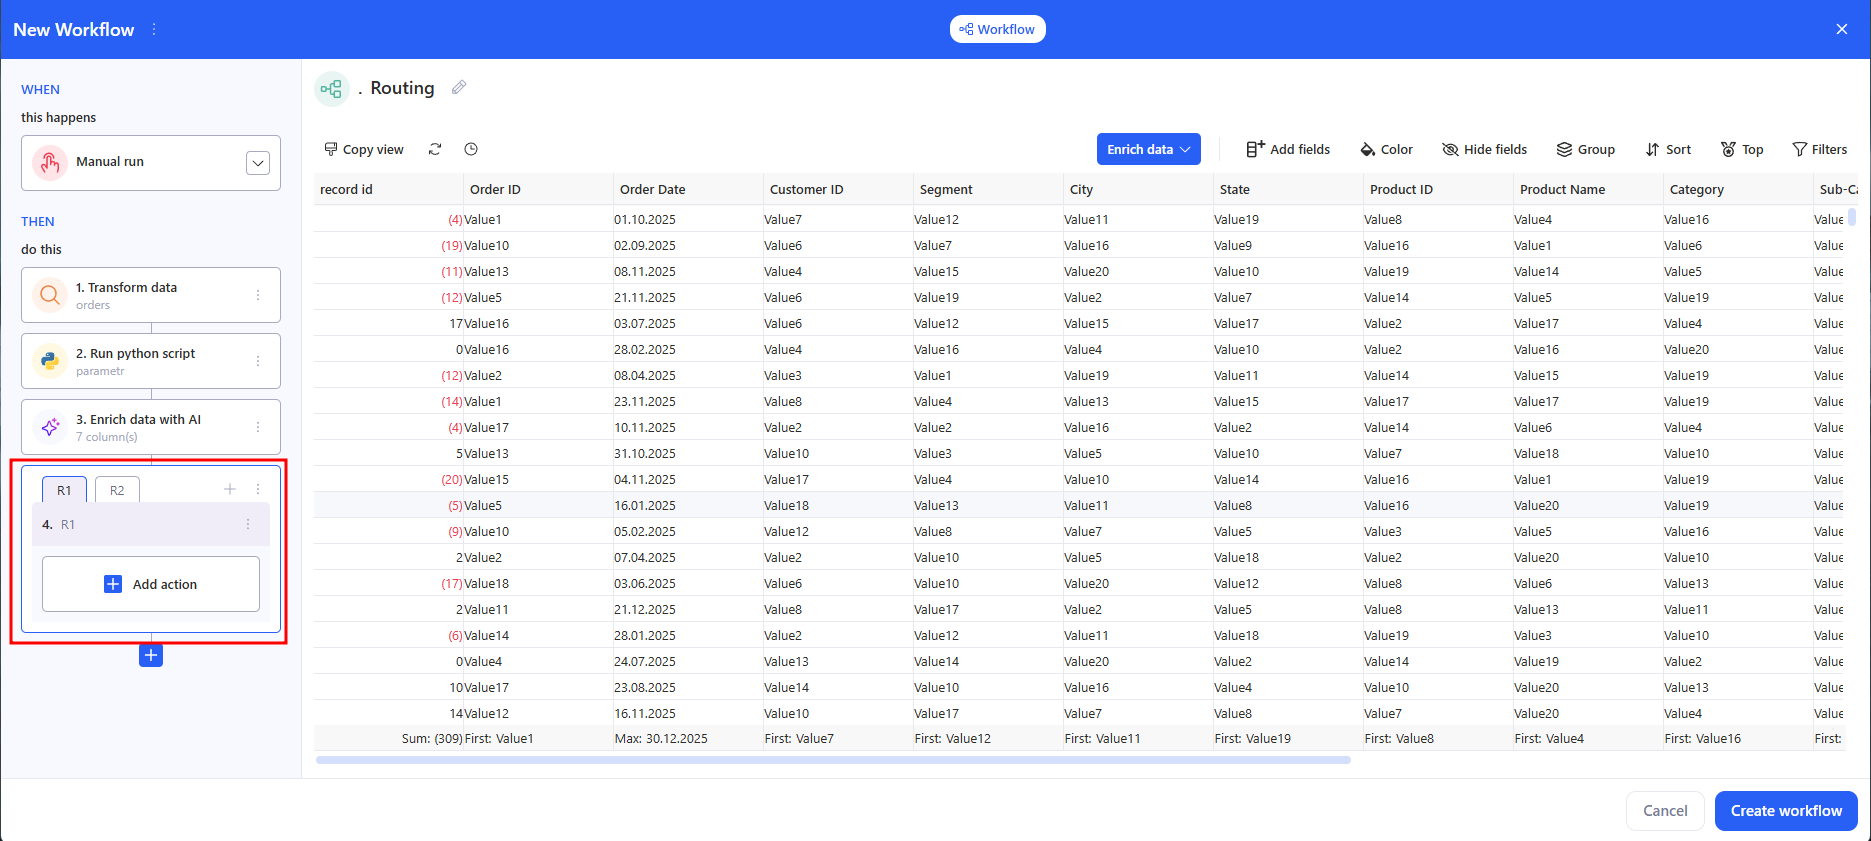
3.12.3 Add actions inside a route
- Select the route you need (for example, R1).
- In the route block, click Add action and add the steps you need (Send email, Export to data source, Report, etc.).
- Repeat for R2, R3… if needed.
3.12.4 Result
Routing creates multiple independent branches where:
- the input is one table,
- each branch (route) can have its own data view/slice,
- each branch runs its own set of actions.
3.13 Logic: Interrupt workflow
This task has no settings: you simply place it where you need it in the chain. Its purpose is to immediately stop the workflow execution at the point where this step is added. All steps after it will not run.
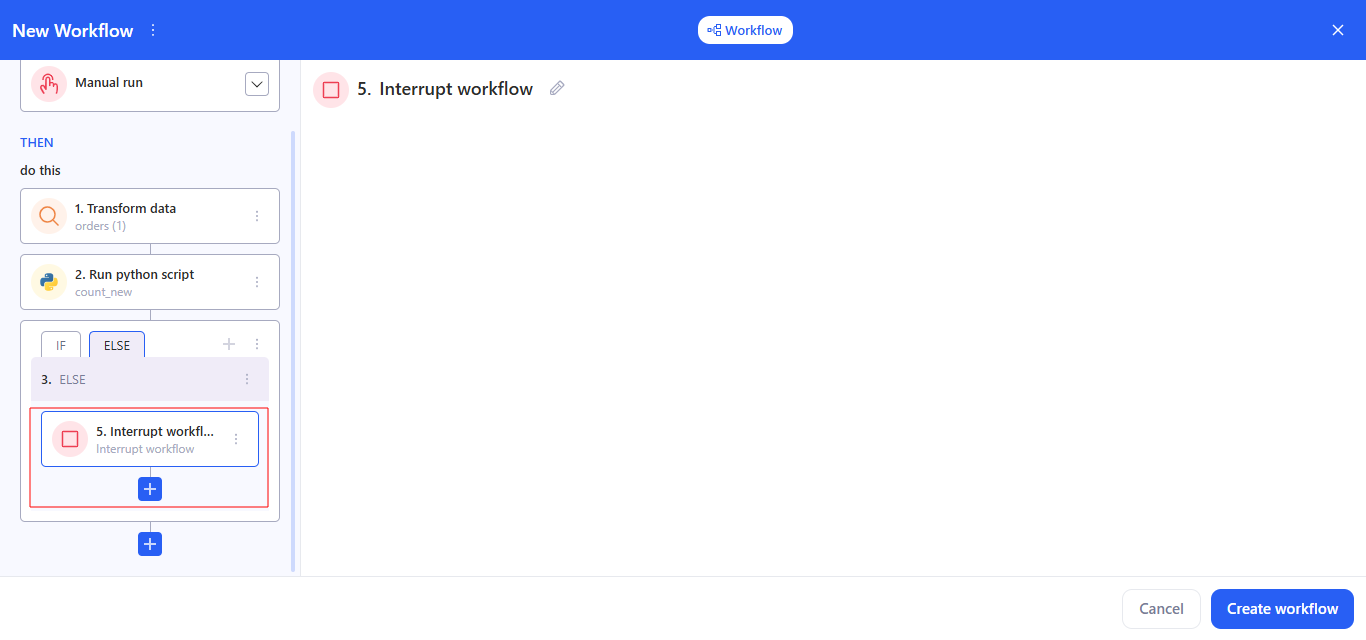
For example, it works like an “emergency stop” inside If / Else or Routing branches, so you can explicitly end routes you don’t need.
4. Save
Сlick Create workflow.
5. Update workflow
When you open an existing workflow from Home → Workflows, the editor shows the current WHEN (schedule) and THEN steps. The Create workflow button is replaced with Update workflow (bottom-right). Update workflow saves changes to an existing workflow (schedule, steps, bindings, Behavior). After saving, both scheduled and manual runs use the latest version.
6. Manual run & history
Use manual runs to test or trigger a workflow on demand. A manual run does not change the schedule.
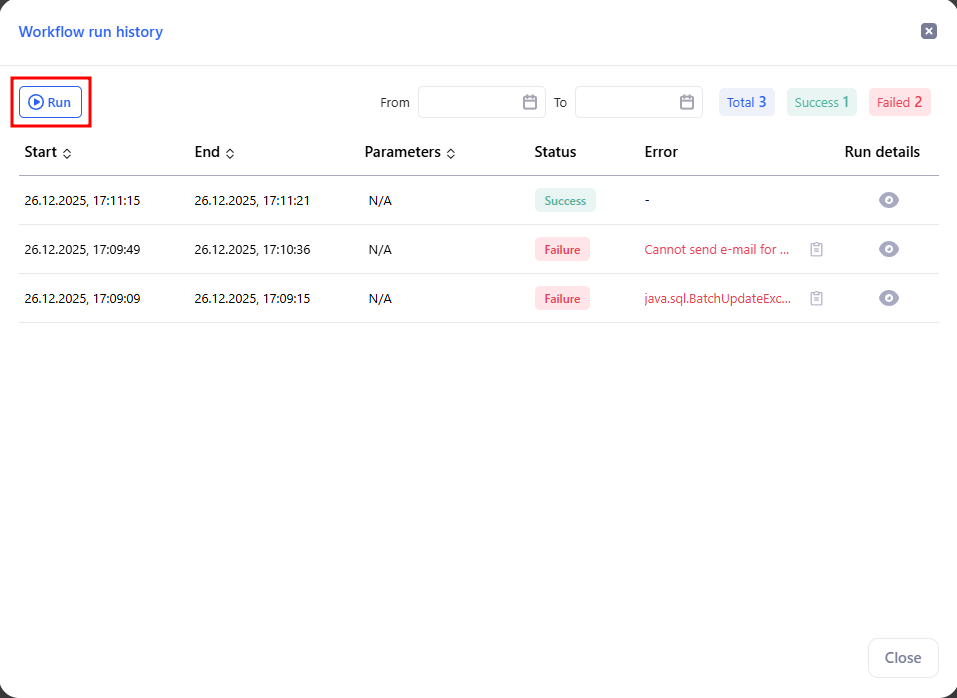
6.1 Run from the workflow editor
- Click Run history (top-right).
- In the modal, press Run to start immediately.
- The table shows Start, End, Status, and Error for each attempt. Use the date filters and counters (Total / Success / Failed) to review past runs.

6.2 Run from Home → Workflows
- Open Home → Workflows.
- In the row of a workflow, open the three-dot menu → Run.
- The current Status appears in the list; open the workflow and Run history for details.
Status shows the last result: Success, Failed, Running, Stopped.
6.3 Run from the Control panel
You can also start a workflow from the Control panel using a button:
- Open Controls → Configure → Add new control.
- In Control type, choose Button.
- In Action, select Run workflow.
- In the Select workflows modal, select one workflow that this control should run.
- Click Save.
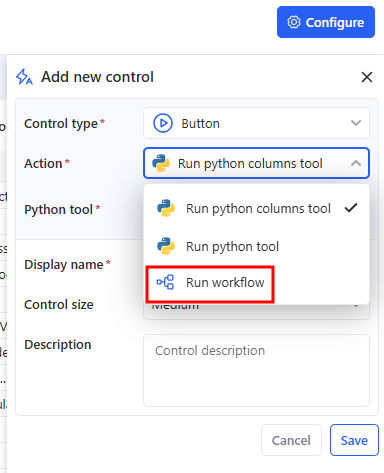
After that, users can run the selected workflows directly from the controls panel.
6.4 Run from AI Chat (Agent commands)
You can run a workflow from AI Chat as an agent command, but first you need to add it to the AI agent.
a. Step 1. Add the workflow to the AI agent
- Go to Agents and open the agent you need.
- In the Commands section, click + (add command).
- In the Select workflows modal:
- choose one or more workflows,
- click Apply.
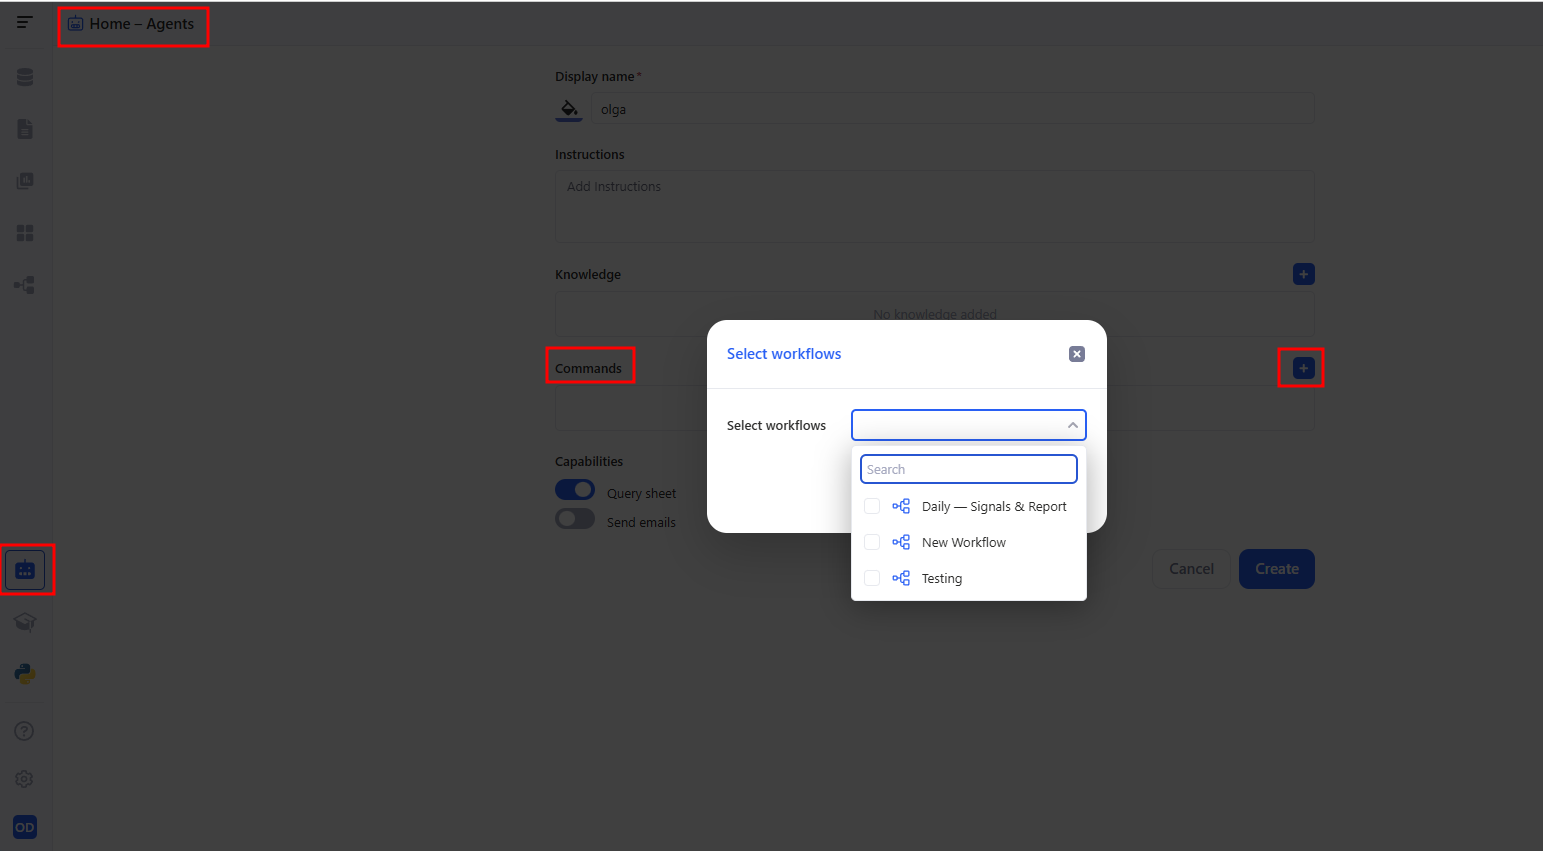
After that, the selected workflows will appear as available commands for the agent.
b. Step 2. Run the workflow from AI Chat
- Open the AI Chat tab.
- Select the agent in the left panel.
- In Agent commands, click the workflow command you need to start it.
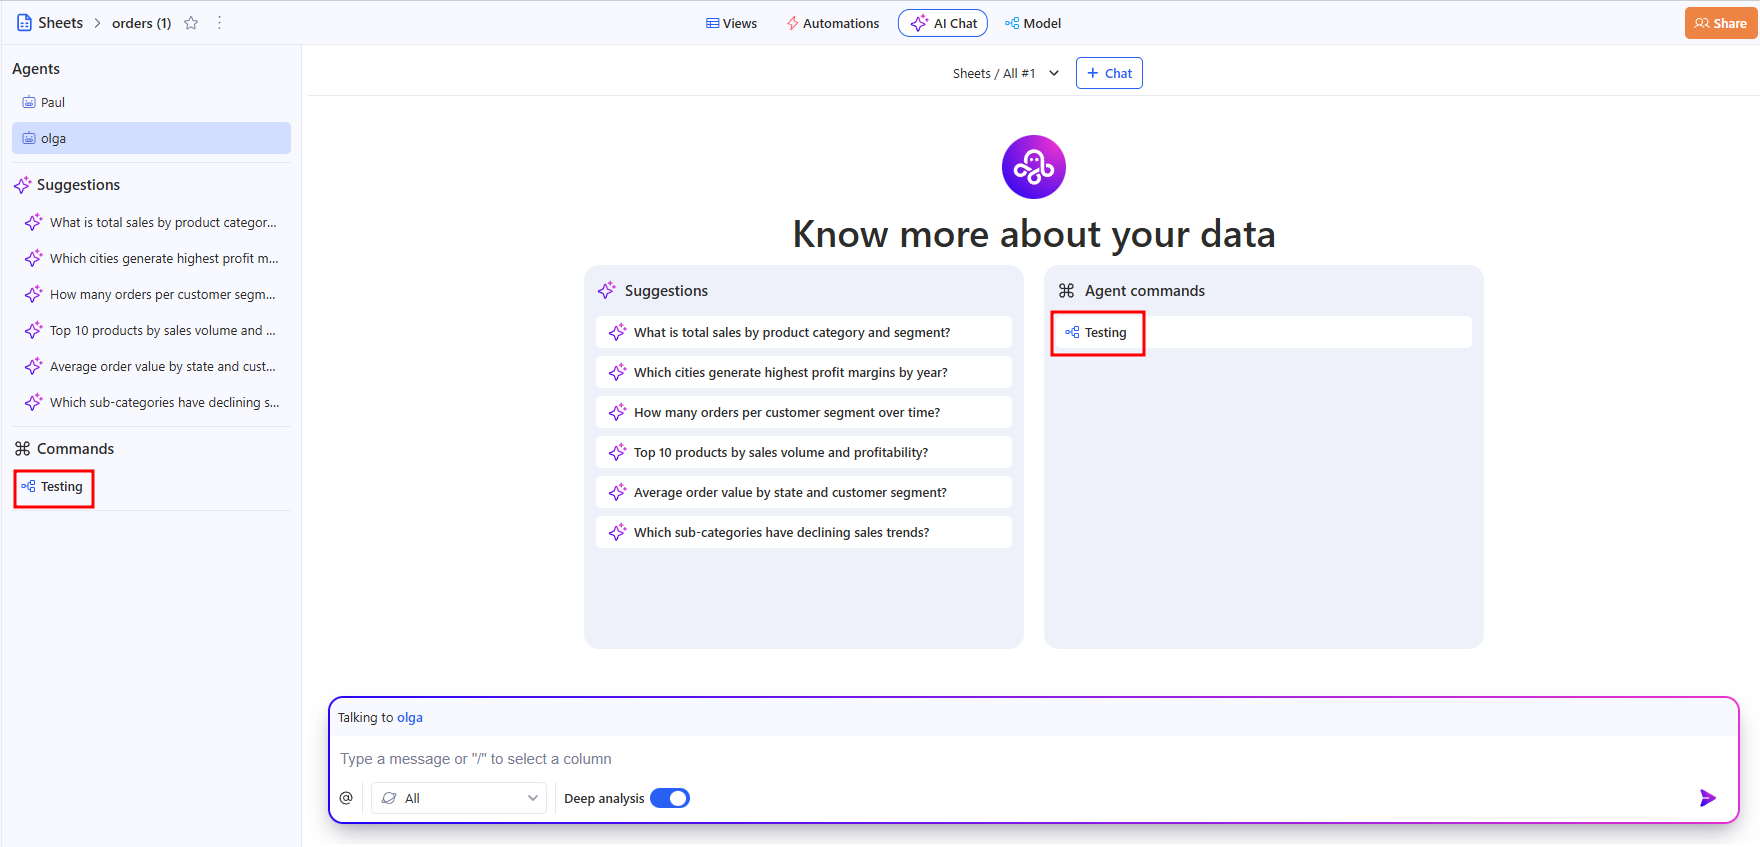
This is handy when you want to run a workflow without going to the editor or the Workflows list.
7. Reorder / Delete steps
- Reorder: drag & drop steps in THEN. If you move a step above its data source, dependent steps show Invalid task ref; open them and re-bind fields via +.
- Delete: trash icon on a step. Steps referencing a deleted step also show Invalid task ref — fix or remove those bindings. Deletion can’t be undone.